DIY Wedding Decorations
If you’re anything like, well, most brides-to-be, you probably fall in one of two camps. Either you’ve been planning the wedding nonstop since moments after the engagement, or you’re dragging your feet about all of it. Either way, even just thinking about your wedding can bring on a stress migraine. Relax! You’ll have it all ready in time for the big day. You will. Some things will be perfect and come off without a hitch and other things won’t go quite as you planned. Worry not; they too will be perfect later on because they’ll make great stories.
As you also probably know, wedding decorations can be expensive especially if rented through the venue, as in order to make a higher margin, the prices can be well above the actual costs. For the time being, here’s an idea for you. See if you can’t get a group of your friends together and work on some DIY wedding decorations. Not only will you be making headway on the wedding planning, but crafting is also a great way to save some money. Here are some thrifty projects to get you started:
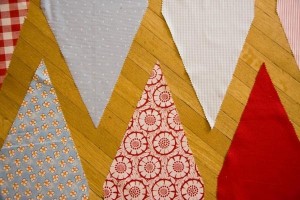
Pennant Banner
 http://www.oncewed.com/7483/diy-wedding/decor/diy-wedding-pennant-banner/
The great thing about this project is that you can keep the banner in your wedding colors or give it a down-home feel by using varying fabrics.
What You’ll Need: -Fabric, gingham works well here and is generally the cheapest to purchase per yard -Pinking Shears -A ruler -Cording or rope, this will be the length of your banner, so get as much as you need for the appropriate length -Sewing Pins -Sewing machine or Fabric glueSimply cut your fabric with your pinking shear into a triangle shape. Choose whatever size you like. Remember, if it will be hung high up, you’ll want to make the triangles larger so that they’ll be visible from the ground. Next, roll the widest part of the fabric triangle around your cording a few times. If you are using a sewing machine, pin lengthwise along the cording and then sew in a straight line just beneath the cording. If you are using fabric glue, put a thin line onto your fabric and roll the cording enough to cover it.
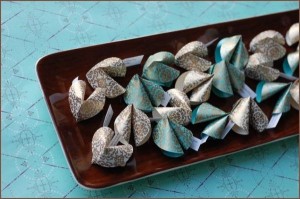
Decorative Fortune Cookies
 http://www.oncewed.com/7578/diy-wedding/favors/diy-fortune-cookie-favors/
With personalized messages tucked inside, these fortune cookies look darling scattered about on the dinner tables or placed around the reception area in glass bowls.
What You’ll Need: -Decorative paper, thinner than cardstock. A resume weight paper works nicely -Regular Printer Paper -Double-sided tape -Scissors -Pint glassUse the mouth of your pint glass as a template to trace around on the wrong side of your decorative paper. Cut out your circles. Fold these circles in half so that the decorative sides face in and make a crease. Open your paper circle and turn it so that the printed side is out and the crease runs up and down. Fold in half again with the blank sides of the paper on the inside. This crease should be perpendicular to the first. With your fingers, hold the circle closed in the middle along the edge and push in on the sides of the circle. With your other pointer finger, push down on the folded edge in the middle. This will form your fortune cookie shape. Print out messages, not longer than a sentence, and cut into thin strips. Insert inside of your fortune cookie. Put a small strip of tape between the two “legs” of the cookie to help it hold its shape.
Tissue Paper Flowery Poms
The trick to wedding decorations is to keep them simple, yet elegant. These flowery poms can be strewn on tables, suspended in the air, or hung “bouquets” and make a beautiful, yet subtle, addition to any wedding.
What You’ll Need: -Tissue Paper -String -ScissorsCut the tissue paper into rectangular squares that are approximately twice as long as the desired final size. You’ll need ten layers of paper per flower. Fold the paper accordion-style every ½” or so. Cut the string to your desired length. If they’ll be sitting on tables, a short length will do, but for hanging flowers, you’ll want nice long pieces that are a foot or so longer than the finished length. Tie one end of the string in the middle of your accordioned paper. Round the edges of your paper. These will become your petals on the flower. Fan the paper out from the center. Lift each layer up so that they become ruffles. Continue and work them into a ball shape. Crinkle the edges a bit and voila!
Rob Toledo is planning a summer wedding at the moment. He recommends thinking about sapphire rings and
matching wedding bands for some fun and unique option.
– GUEST POST
Leave a Reply