If you wish to spice up your walls a little bit, decoupaging your switch plates is an easy and inexpensive project that is sure to perk up your walls.
Any regular, boring switch plate you may have can be altered. Just unscrew it from the wall, grab the other supplies listed below, and off you go!
Here are the materials you will need for this project, aside from the switch plate:
1.Mod Podge, a decoupage glue which comes in matte or glossy finish (I used the matte finish.)
2.foam brush
3.decorative paper
4.self-healing mat or any surface you can cut on
5.X-acto or any precision knife
6.decorative embellishments, optional
7.distressing ink, optional
8.foam applicator for the ink, optional
9.screwdriver to install your switch plate
Using a foam brush, apply a moderate coat of Mod Podge on the face of the switch plate. Place the plate face down on the back and center of your decorative paper. Smooth out any air bubbles with your hand. (Make sure you protect your work surface with old newspaper. I just remove mine whenever I’d take a shot with my camera so there’s not much clutter in the photo.)
Fold the edges of the paper over the back of the switch plate, making sure to crease the paper where it meets the edge of the plate. If you want, you can trim off the excess paper. (I usually trim off any paper that goes beyond the back side of the switch plate’s lip.)
Add Mod Podge to the paper and fold it over the switch plate, smoothing the paper again with your hand to make sure it’s adhered well to the plate. For the corners, just tuck in the paper like you would when wrapping a gift. Allow the glue to dry for about 10 minutes before proceeding to the next step.
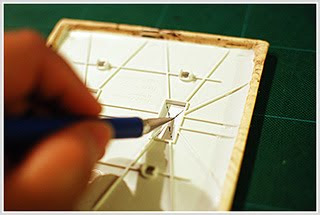
With a precision knife, cut an ‘x’ in the switch holes. Start in one corner and slide your knife diagonally through the paper until you reach the center point. (Stopping at the center makes for a neater cut.) Do this on all four corners and make sure you cut on a self-healing mat or any other surface that’s safe to cut on.
Apply Mod Podge to the paper and fold over. It doesn’t matter if parts of the switch plate are showing on the sides of the hole because it’s going to get covered by the switch when you install it on the wall.
With a foam applicator, rub some distressing ink on the edges of the switch plate to highlight the contour of the plate. (Inking is an optional step. If you don’t have distressing ink or a foam applicator, don’t stress about it.) Thinly cover the surface of the plate with Mod Podge to seal and allow to dry for 10 to 15 minutes before proceeding to the next step.
Adhere a decorative accent on the switch plate, if you wish. (I used a fancy button. And again, adding a decorative accent is optional.) Do this sparingly though because it’s important not to hinder the ergonomics of the light switches. Poke the screw holes and there you have it – your very own altered switch plate!
Just make sure your plate is completely dry before installing it on the wall. Mod Podge just takes 10 to 15 minutes to dry so you don’t have to wait too long! Additional Ideas: If you’re altering a switch plate for, let’s say, two switches, you don’t have to limit yourself to using a 2-gang switch plate. Why not use a 3- or 4-gang switch plate and take advantage of the extra space to make your plate more decorative.
For a ‘toggle’ switch plate, decoupage the plate and make holes for the two switches. Leave the third hole hidden and use that space to decorate on.
For a ‘rocker’ or decora switch plate, decoupage the plate and either hide the third hole so you can use the space to decorate on or reveal the hole and use it as a frame to display a small photo.
Since you’re using an extra gang, you’ll have extra screw holes. Either keep the extra screw holes hidden or use them to attach a ribbon and some decorative beads. Aside from using bulky embellishments, you can also use collage elements as decorative accents for your altered switch plates.
Johwey Redington is an architect, photographer, homeschooler, and artist who blogs about her family life, creativity, and green practices at http://www.johwey.com/.